Setting up REC:
iOS:
1. Plug the REC into an outlet with power;
2. Search Ankuoo and download REC Switch app from App Store;
3. Open REC app;
4. Click Sign up at the bottom of the homepage;
5. Create an account (please use a real email address, since this will be used for recover your password in case you forget it);
6. Log in using the account you have just created;
7. Click + to add new device;
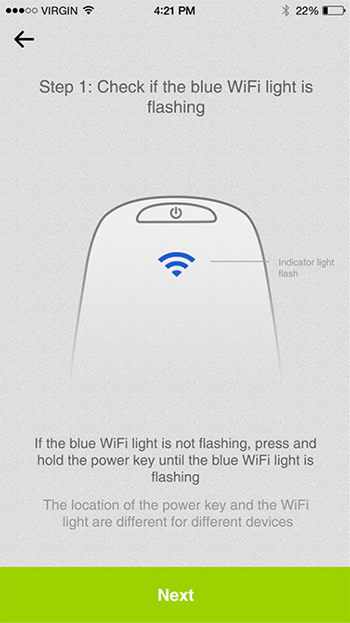
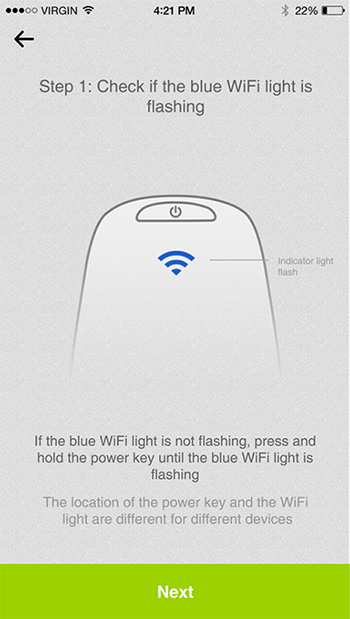
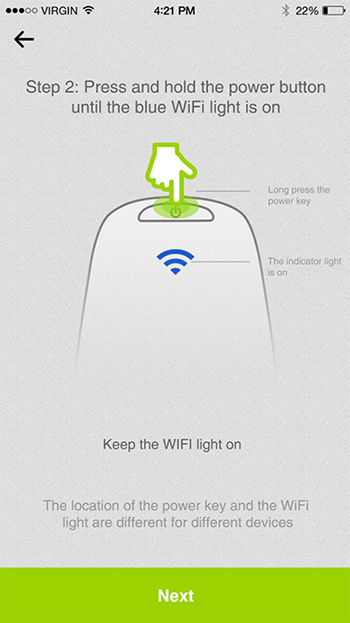
8. Press and hold the On/Off button for more than 5 seconds, till you see the blue Wi-Fi indicator flashing quickly (if the light is already flashing quickly, you can skip this step);
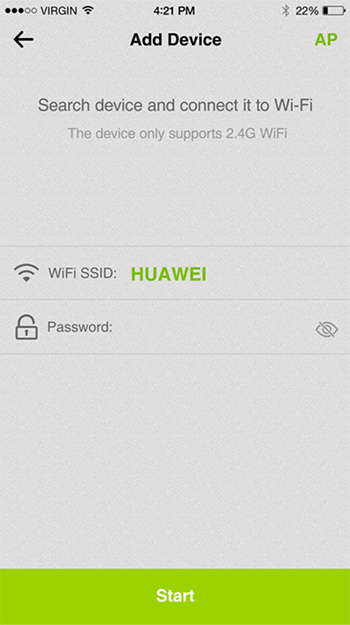
9. Input your 2.4 GHz Wi-Fi password; please make sure you input the right SSID and password, then click Start button;
10. When REC is successfully connected to the router, the blue Wi-Fi indicator will turn off and you will see the switch listed at Devices page,if connect failed,you can see AP Operation
2. Search Ankuoo and download REC Switch app from App Store;
3. Open REC app;
4. Click Sign up at the bottom of the homepage;
5. Create an account (please use a real email address, since this will be used for recover your password in case you forget it);
6. Log in using the account you have just created;
7. Click + to add new device;
8. Press and hold the On/Off button for more than 5 seconds, till you see the blue Wi-Fi indicator flashing quickly (if the light is already flashing quickly, you can skip this step);
9. Input your 2.4 GHz Wi-Fi password; please make sure you input the right SSID and password, then click Start button;
10. When REC is successfully connected to the router, the blue Wi-Fi indicator will turn off and you will see the switch listed at Devices page,if connect failed,you can see AP Operation
Android:
1. Plug the REC into an outlet with the power on;
2. Search Ankuoo and download REC Smart app from Play Store;
3. Open REC app;
4. Click Sign up at the bottom of the homepage;
5. Create an account (please use a real email address, since this will be used for recover your password in case you forget it);
6. Log in using the account you have just created;
7. Click + to add new device;
8. Press and hold the On/Off button for more than 5 seconds, till you see the blue Wi-Fi indicator flashing quickly (if the light is already flashing quickly, you can skip this step);
9. Input your 2.4 GHz Wi-Fi password (please make sure you input the right SSID and password), then click Start button;
10. When REC is successfully connected to the router, the blue Wi-Fi indicator will turn off and you will see the switch listed at Devices page. if connect failed,you can see AP Operation
AP Operation:
1. Plug REC into an outlet;
2. Click Add button;
3. Click Next on next screen (Step 1: Check if the blue WiFi light is flashing);
4. Click AP on the top right corner of next screen (Search device and connect it to WiFi); DO NOT click Start on this page (Start will lead you to regular setup process, not AP setup process);
5. Press and hold on/off button for more than 5 seconds to enter configuration mode (WiFi indicator flashes quickly);
6. IMPORTANT: press and hold the on/off button AGAIN to enter AP mode (WiFi indicator stays on);
7. Click Connect immediately on next screen (Step Three: Switch the phone network so that );
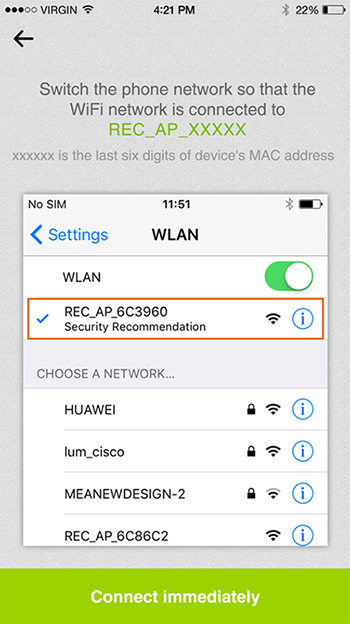
8. REC app will bring you to your phones WiFi settings: choose REC_AP_XXXXXX from the available WiFi list, where XXXXXX is the last six digits of your RECs MAC address; then come back to REC app
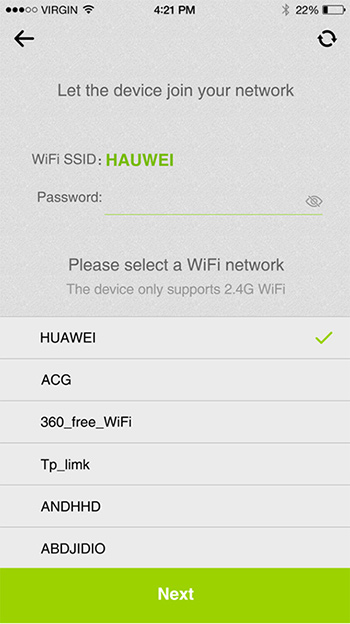
9. Choose the WiFi that you are going to use for REC; enter its password; REC is now pairing with your router (this may take up to 45 seconds);
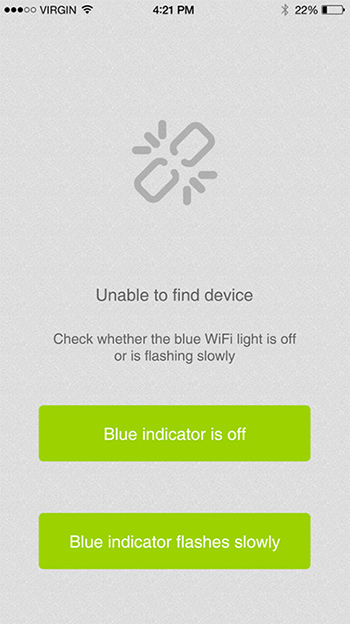
10. If the configuration fails, check the WiFi indicator status and follow the steps on screen to resolve the issue.
2. Click Add button;
3. Click Next on next screen (Step 1: Check if the blue WiFi light is flashing);
4. Click AP on the top right corner of next screen (Search device and connect it to WiFi); DO NOT click Start on this page (Start will lead you to regular setup process, not AP setup process);
5. Press and hold on/off button for more than 5 seconds to enter configuration mode (WiFi indicator flashes quickly);
6. IMPORTANT: press and hold the on/off button AGAIN to enter AP mode (WiFi indicator stays on);
7. Click Connect immediately on next screen (Step Three: Switch the phone network so that );
8. REC app will bring you to your phones WiFi settings: choose REC_AP_XXXXXX from the available WiFi list, where XXXXXX is the last six digits of your RECs MAC address; then come back to REC app
9. Choose the WiFi that you are going to use for REC; enter its password; REC is now pairing with your router (this may take up to 45 seconds);
10. If the configuration fails, check the WiFi indicator status and follow the steps on screen to resolve the issue.
Work with Alexa:
1. Download Alexa app:
a. iOS: search Alexa in App Store;
b. Android: search Alexa in Play Store;
2. Open Alexa app;
3. Login using your Amazon account;
4. Click the left corner and open the menu;
5. Click Skills;
6. Type in REC in the search box;
7. Click Ankuoo REC in the search results;
8. Click Enable button on the skill page;
9. Next page is the Ankuoos login page, please use the account you have created in REC app to login; if you have not done so, please download REC app and use Sign up button on the bottom to create an account;
10. A page Alexa has been successfully linked with Ankuoo REC. pops up; close this page;
11. Click Discover Devices; Alexa will search for all your REC devices now (make sure your phone is connected to the same Wi-Fi as REC;Note:Before discover devices, you must change the switch name in REC app,such as kitchen,office..);
12. Now you can control your REC devices using Alexa.
Using REC:
Timers
* REC has 3 kinds of timers: Countdown, Anti-theft and Schedule
* We use military time for these timers: left side is the On time with the hour and minute, and right side is the Off time with the hour and minute.
* You may have up to 16 timers for each switch.
* Once Anti-theft time is active, Countdown and Schedule timers will be deactivated.
* By default, a timer will only work once and become inactive (greyed out) after its action. If you want a timer to work repeatedly, you should set Repeat day on the Schedule page.
* Note: make sure a timer does not cross days. For example, if you want your switch to be on at 10:00 PM (22:00) on Friday night and off at 5:00 AM (05:00) on Saturday morning, you should set two different timers: one is ON at 22:00 of Friday and the other one is OFF at Saturday 05:00. You cannot set one timer that is ON at 22:00 and OFF at 5:00 on Friday or Saturday.
* Anti-theft timer is designed
Name and logo
You may change the name and logo for your REC switch by clicking the gear icon on the top right corner of the switchs homepage. You can also pick or take a picture for it by clicking the add icon on the bottom.
Multi user / phone /app
You would only need to setup REC switch once. You can share your account information with other people and let them control REC switches using your account (they would need have REC app installed on their phones).
Adding a timer
You can add a timer by click the + button on the bottom of the devices homepage.
Countdown preset timers
Countdown timers have 6 preset timer for your convenience: 5 minutes, 10 minutes, 15 minutes, 30 minutes, 1 hour and 2 hours.
Deleting a timer
To delete a timer, press and hold the timer on your REC app; when you see the delete page, check the box on the left and click the trash icon on the bottom to delete it.
Re-configure timers
To change time for a timer, go to the timer and select the time you want, and click ok.
Refresh or real-time
You can get the real-time information by click the refresh button on the top right corner of Devices page
Anti-theft timer and Schedule timer
Anti-theft timer is designed to be used when you are away from home. The timer will turn on and off the switch randomly during a certain period. If you want to turn on/off your switch at fixed times, you should use Schedule timer.
Max current and power
Maximum current: 15 A
Maximum power: 1800 Watts
Maximum power: 1800 Watts
Environment
REC switches are designed to be used indoors only
Power consumption
REC switch consumes about 1.5 Watts
Light status meanings
Light flashes quickly: REC switch is in factory mode and ready for configuration
Light off: REC switch has successfully connected to the router
Light off: REC switch has successfully connected to the router
Warranty:
NEW REC switches have 18-month warranty from authorized retailers and distributors.
